How to Build an Aquaponics Floating Raft System (AKA Growing Food with Fishy Friends)
Hey there, fellow plant lovers and fish fans! Ready to take a dive into the fascinating world of aquaponics? Today, we’re going to explore how to build your very own aquaponics floating raft system—aka the perfect combo of gardening and fish farming. Imagine growing your own veggies while your fish do all the hard work (well, except maybe for that one lazy fish). Trust me, once you’re hooked (pun intended), you’ll be wondering why you didn’t start sooner.
I’ve been playing around with aquaponics for a while now, and honestly, there’s something magical about watching your plants and fish thrive together. It’s like your own personal ecosystem, whether it’s in the backyard or your living room. So grab a cup of coffee (or tea, we don’t judge), settle in, and let’s dive into the amazing world of aquaponics floating rafts!
What Is an Aquaponics Floating Raft System?
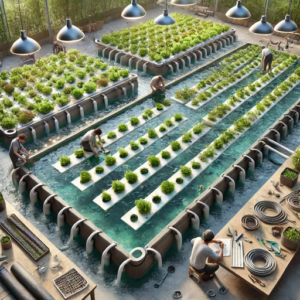
Before we start playing Bob the Builder, let’s clear up what an aquaponics floating raft system actually is. Picture this: a mini ecosystem where fish and plants work together in perfect harmony right in your home. Fish provide nutrients for the plants, and the plants filter the water for the fish. And the “floating raft” part? That’s where your plants literally float on a raft above the water, growing as if they’re on a tropical vacation.
In short: fish swim, fish poop, plants gobble up the nutrients, and the water gets filtered. Rinse and repeat. It’s basically nature’s recycling system, with your garden and fish tank working together like best buds. How to Build an Aquaponics Floating Raft System.
Why You Need a Floating Raft System in Your Life
Alright, let’s talk benefits—because who doesn’t love perks? Here’s why you should consider building one of these bad boys:
-
- Space-saving superstar: Perfect for urban gardening or small spaces. You can grow a surprising amount in a teeny tiny area.
- Water-saving wizard: Uses up to 90% less water than regular ol’ gardening. Mother Earth approves.
- Fast-growing food: Plants grow faster in this nutrient-rich environment. You’ll be enjoying fresh lettuce in about 4-5 weeks—now that’s quick!
- Double the harvest: Veggies + fish. It’s like getting a 2-for-1 deal at your local farm.
- Low-maintenance magic: Once set up, it’s almost hands-off. No weeding, no watering, just feeding fish and harvesting your goodies.
- All-season farming: With proper lighting and temperature, you can keep growing year-round—even when it’s snowing outside!
- Pest-free paradise: No need for nasty pesticides or herbicides. The system naturally keeps most bugs away.
- Learning experience: This is a perfect project for teaching kids (or adults!) about nature, ecosystems, and sustainable living. Who knew fish poop could be so educational?
What You’ll Need to Get Started
Now, let’s get into the nitty-gritty. Here’s your shopping list for building your aquaponics system.
Fish Tank Gear:
-
- Large fish tank (at least 100 gallons)
- Fish-safe sealant (because leaky tanks are a bummer)
- Aquarium heater (if your fish like it warm and cozy)
- Fish net (to catch your slippery little swimmers)
- Fish food (happy fish, happy plants)
Grow Bed Goodies:
-
- Shallow container (8-12 inches deep)
- Styrofoam sheets (for those floating rafts)
- Net pots
- Growing medium (like rockwool or clay pebbles)
- Seeds or seedlings (your future salad stars)
Plumbing & Pump Parts:
-
- Submersible pump (one that turns over your tank volume at least once per hour)
- PVC pipes and fittings (for some good ol’ plumbing)
- Air pump and air stones (for that extra oxygen boost)
- Tubing for air and water
- Valves and connectors (to keep things flowing)
- Uniseals or bulkhead fittings (to avoid leaks)
Tools & Extras:
-
- Drill with hole saw attachments
- Saw (for PVC and Styrofoam)
- PVC cement and primer (to glue things together)
- Measuring tape and level (let’s keep it straight, folks)
- Thermometer (to keep things toasty)
- pH test kit and ammonia/nitrite/nitrate test kits (science, baby!)
Step-by-Step: Let’s Build This Thing!
Step 1: Plan Your Setup
Before you start sawing and gluing, take a moment to plan. How much space do you have? What kinds of fish and plants do you want to grow? Sketch it out on paper. Trust me, this saves a lot of “oops” moments later.
For beginners, I suggest starting with a 100-gallon fish tank and a 4×4-foot grow bed. Once you get the hang of it, you can expand your operation like the aquaponics boss you’re destined to be.
Step 2: Set Up the Fish Tank
First, give your fish a comfy home. I love using a big IBC tote because it’s sturdy and affordable. Just make sure to clean it well if it’s been used before. You don’t want any mystery chemicals crashing your aquaponics party.
-
- Rinse the tank with clean water.
- Seal any leaks with fish-safe sealant.
- Install a heater if your climate is chilly (your fish will thank you).
- Place the tank in its final spot. Remember: once it’s filled with water, it’s staying there!
Step 3: Build the Grow Bed
Next up is creating your plant paradise. Make sure the grow bed is deep enough to float several rafts without being a hassle to reach.
-
- Choose a sturdy container for the grow bed—no wobbly containers allowed!
- Position it above the fish tank (you might need to build a stand or use a sturdy table).
- Make sure it’s level—nobody likes soggy plants.
- Drill holes for your plumbing: one for water in, one for water out.
Step 4: Plumbing Time!
Now comes the fun part—plumbing! You’ll connect the fish tank to the grow bed using PVC pipes.
-
- Install a bulkhead fitting near the top of your fish tank.
- Run PVC from the tank to the grow bed inlet.
- At the grow bed’s other end, install another bulkhead fitting to return the water back to the fish tank.
- Use valves to control the water flow like a pro.
- Use PVC primer and cement to make sure everything is nice and watertight.
Step 5: Crafting the Floating Rafts
Time to get crafty! The rafts are where your plants will live their best lives.
-
- Cut your Styrofoam sheets to fit the grow bed, leaving a bit of space around the edges for water flow.
- Mark spots for your plants (I space mine about 6-8 inches apart).
- Drill holes in the Styrofoam for your net pots.
- Sand down rough edges to avoid Styrofoam bits floating in your system.
Step 6: Pump and Aeration
Finally, let’s get things moving. Install your submersible pump in the fish tank to keep the water flowing to the grow bed. And don’t forget air stones in the grow bed—your plants’ roots need oxygen, too!
Step 7: Cycle the System (Patience Is Key)
Before adding fish and plants, you need to “cycle” the system. This process establishes beneficial bacteria to convert fish waste into plant food. It takes about 4-6 weeks, but trust me, the wait is worth it!
Step 8: Introduce Fish and Plants
Once your system is cycled, it’s time to introduce your new aquatic and leafy roommates!
-
- Fish picks: Tilapia, goldfish, trout, or catfish are great options.
- Plant picks: Start with leafy greens like lettuce, spinach, or herbs.
Maintenance and Troubleshooting
Maintaining your system is pretty easy. Feed the fish, check water levels, and harvest when it’s time. Keep an eye on water quality and fish health, and your system will thrive. If problems pop up—like high ammonia or sick fish—address them quickly to keep everything in balance.
And that’s a wrap! You’re now well on your way to growing fresh food with a little help from your fishy friends. Whether you’re after homegrown veggies or a more sustainable lifestyle, aquaponics is a fun, eco-friendly way to get there. Happy growing, and may your plants and fish always flourish!
Conclusion
Building an aquaponics floating raft system is an exciting journey into sustainable food production. It’s a bit of work upfront, but the rewards are well worth it. You’ll have fresh, home-grown produce and the satisfaction of creating a mini-ecosystem. So why not give it a try? Your taste buds (and the environment) will thank you!
FAQs
- How often should I feed the fish in my aquaponics system?
Generally, feed your fish 2-3 times a day, but only as much as they can consume in about 5 minutes. - Can I use any type of fish in my aquaponics system?
While many fish species can work, tilapia, trout, and goldfish are popular choices due to their hardiness and adaptability. - How long does it take for plants to grow in an aquaponics system?
Growth rates can vary, but many leafy greens are ready to harvest in 3-4 weeks, which is often faster than traditional soil gardening. - Is it necessary to add fertilizers to an aquaponics system?
Generally, no. The fish waste provides most of the nutrients, but you might need to supplement with iron occasionally. - Can I run an aquaponics system indoors?
Absolutely! With proper lighting and temperature control, aquaponics systems can thrive indoors year-round.
How to Build an Aquaponics Floating Raft System.